Canvas FAQ
Canvas Help
- Help menu within Canvas: 24/7 chat and phone support
- Moving from Sakai to Canvas: Training videos and resources to help UNC instructors move from Sakai to Canvas
- Instructor Guides and Videos
- Student Guides and Videos
Tutorial Videos and Help Guides
Learn on your own by viewing these 2-5 minute videos and help guides providing an overview of the Canvas system and tools.
Getting Started in Canvas
Go to canvas.unc.edu and click the Onyen Login button to sign into Canvas.
When you log into Canvas, you will arrive in your Dashboard where you will see what is happening in all your current courses. In the To Do List, students see a list of up to 25 items they need to do in their courses, while instructors will see items they need to grade.
Update your User Settings to add your profile photo, pronouns, and any additional contact information.
One of the first things we recommend doing is updating your Notification Settings. You can control how often you receive notifications in your email inbox and/or through Canvas App push notifications: right away, daily summary, weekly summary, or not at all
All digital content must be accessible to all users. We recommend regularly using the built-in Accessibility Checker in the Canvas Rich Content Editor.
Also, the University’s Digital Accessibility Office (DAO) offers accessibility assessments for course content, guidance on fixing issues, and resources to learn more. Please review the DAO’s Top 10 Tips for Digital Accessibility.
The Inbox is the internal messaging system in Canvas. You can receive email and Canvas App push notifications of your messages. See the “Update Your Notifications” question above for more information.
The Calendar allows you to see all course assignments and events in one place. It includes the Scheduler, which allows students to sign up for appointment slots. Learn more in the Calendar Overview for Instructors video.
There are Canvas apps for students and instructors! Learn more in the Canvas Student App video and Canvas Teacher App video. See Canvas Guides by Mobile App.
Canvas: Current Status | Uptime History
Maintenance Windows: 1st and 3rd Thursday of the month from 3:05am to 5:05am ET (Thursday from 7:05am to 9:05am UTC). Release notes are linked in your Canvas Account > Settings.
Students
“Get Started with Canvas as a Student” in under 30 minutes! Watch this mini-series of six quick videos to learn how to use Canvas, set up notification preferences, use the Canvas Student app, navigate the dashboard, and access and submit assignments.
If you would like to take an even deeper dive into Canvas, students may take the open self-paced course “Passport to Canvas” at any time. It consists of nine modules of content that take students through everything they need to know about using Canvas as a student. Note: This course is managed by Canvas Instructure, not UNC-Chapel Hill. It requires creating a separate Canvas account to access. The course is for informational purposes only and is not required.
Instructors
All Instructor Guides and Videos
- Course Setup and Settings
- Course Activity and Communication
- Content Management
- Assignments, Quizzes, Grading
- External Tool Integrations
Course Setup and Settings
Here is a 6-minute Canvas Overview for instructors to learn about the Canvas Dashboard, sidebar, global navigation menu, and course interface.
Here is a quick infographic with these steps!
- Log into Canvas with your Onyen and click through the brief tutorial
- From your Dashboard, click on the course you want to set up
- From the Syllabus tool, add your syllabus using the Edit button
- Upload your course documents into Files
- Publish your course. You can give students early access by editing the start date in Settings.
Tip: You can see your class roster in the People tool.
In this mini-series, Instructors will learn to “Set Up your Canvas Course in 30 Minutes or Less!” These 7 videos will get you started with an overview of Canvas, how to build and manage a course, and how to create and manage course content.
See Moving from Sakai to Canvas for recorded video tutorials and guides to help instructors transition from Sakai to Canvas with tool comparisons between the two systems. This resource provides an overview of commonly used tools for instructors to manage their course, communicate and share course materials with students, and collect and provide feedback on student work.
The different tabs within Settings allow you to customize many of your course settings. Below is information on some of the more commonly used features in Settings, but you can learn more in the Course Settings video.
Course Details
- Show recent announcements on course Home page: Allows you to enable this feature, along with how many announcements to show (up to 15)
- Let students attach files to Discussions: Can be enabled/disabled here
- Let students edit/delete Discussion posts: Can be enabled/disabled here
- Disable comments on Announcements: Can be enabled/disabled here
Sections
- View and modify your course sections, including cross-listed sections
Navigation
- Select which tools to enable in your course or hide from students. Until you add content to enabled tools, they will remain hidden from students, indicated by the eyeball icon with a slash through it. We recommend disabling tools you do not plan on using to streamline the student experience.
To add Canvas tools and apps integrated with Canvas, follow the instructions on managing your course navigation menu.
You can also add web links to your course navigation menu. These can be pages within your Canvas site or external links:
- Copy the web page URL from your browser window
- Navigate to course Settings
- Select Apps from the top tabs menu
- Select the Redirect Tool (icon is a downward, right-pointing arrow; can also use Filter by name search field)
- Click +App
- Enter an updated Name
- Paste the web page URL you copied in step #1
- Check “Show in Course Navigation” and other options as needed
- Click Add App
- Refresh the page to see the new link appear in the course navigation menu
The Test Student is automatically enrolled in your Gradebook, and this student view allows you to see the course as your students experience it. With this Test Student, you can submit work and confirm your course is just the way you intended. Reset Test Student to clear out data and start over as needed. See how to view your course as a test student in Student View.
The UNC-CH course template provides instructors with a starting point for building out course content and makes use of Canvas Modules and Pages to organize course materials. It includes visual style, formatting, course module organization, examples of tool use, and instructions and was built with digital accessibility in mind. The template also provides students with a similar learning experience across all courses that have been designed with the template.
If you would like to add the template to a Canvas site, please follow the steps below. It is best to add the template to a blank Canvas site (template will be added on top of existing content if Canvas site has been in use):
- Log into Canvas
- Select Commons on the global navigation
- If requested, click Authorize button to gain access to the Canvas Commons
- On this page, click the “UNC-CH Course Template (Simplified)” tile that has a blue checkmark
- If the tile is not visible, type UNC-CH Course Template into the search bar and press Enter
- On the tile, click the title “UNC-CH Course Template (Simplified)”
- On the right side of the screen, click the Import/Download button
- In the search bar, enter the title of your site and press Enter or check the box next to the site if listed
- Click Import into Course button. The system will take a few moments to add the template to your site.
See screenshots and instructions of how to navigate Canvas Commons.
All UNC-Chapel Hill Faculty, Students and Staff who have an active Onyen have access to Canvas. Rosters are added automatically to Canvas for official course sites based on enrollment data in ConnectCarolina.
If needed, you may add other UNC-Chapel Hill users to your Canvas sites. For example: tech support, instructional designers, departmental colleagues, or students who are not on the roster. To do this, go to the site then select People > +People > select Login ID > enter their Onyen > select a Role > Next > Add User.
For information about adding Non-Onyen Guests to your site, please refer to the Guest Account section at the bottom of the Canvas homepage.
Note: For official course sites, Instructors can add participants only during the semester. Once the semester ends, the +People button will not be clickable. To add users not enrolled in the course after the term has ended, you will need to modify course dates first to be able to add them under People using their Onyens (select Login ID to add them). For specific instructions about managing access for students with IN grades, refer to the “Give Student with Incomplete Grade Access” tab on the Instructor FAQs.
Some instructors may choose to make their course sites public. The most common reasons are to make content available to a wider audience or to facilitate student and auditor access early in the semester. Instructors considering a public course should review detailed information on course visibility before changing course settings to public.
Course Activity and Communication
You can send announcements to your whole course or individual sections and schedule them ahead of time. Students can interact by adding comments and liking announcements (can be disabled). Learn more in the Announcements Overview video.
The Syllabus provides a snapshot of all assignments and course events, which are automatically generated based on dates. You will see the course’s grading groups, have the option of adding customized content, and view/access items to grade in your To Do List. Students will see upcoming assignments in their To Do list. Learn more in the Syllabus for Instructors video.
Discussions allow you to create dynamic asynchronous discussions for students. You have options to grade them, require students to post before seeing others’ posts, and allow students to edit and delete their posts. Learn more in the Discussions Overview video.
Student groups are commonly used for assigning group projects or breaking up larger discussion into smaller groups. Learn more in the Groups Overview video.
Here are some features on using groups:
- Assign Group Leaders to designate a student to coordinate interactions and activities within their group
- View all group activity and student participation within their groups
- Organize enrollment by assigning and reorganizing students as needed into selected groups
- Students can create groups to collaborate, share files, start discussions, and set up study opportunities
Content Management
Files uploaded to your course Files space are easily shared with students. You can create subfolders, hide items from students, and reuse files when imported from one course to another. Learn more in the Files Overview video.
While all major web browsers are supported, if students encounter issues, we suggest trying a different web browser. Safari users may encounter “Access Denied” errors when downloading some files. To resolve this issue, disable the ‘prevent cross-site tracking’ setting in Safari.
This is the first thing your students see when they enter your course. You have the following five display options for your Home Page. Learn more in the Course Home Page Customization video.
- Course Activity Stream (default): Recent course announcements, assignment and discussion updates, course conversations
- Pages Front Page: Design a custom home page using Pages
- Course Modules: Includes all files, assignments, pages, and all other course content you have organized in Modules
- Assignments List: All published assignments, discussions, and quizzes and To Do list of upcoming assignments
- Syllabus: Customized content you added to the Syllabus tool and the Course Summary, including all assignments and course events
Add your customized text and course content through the Rich Content Editor (RCE). Learn more in the Rich Content Editor video. We highly recommend using the built-in Accessibility Checker to make sure your content is accessible to all students.
Similar to Sakai Lessons, the Modules tool is how you structure your course content, which can be by weeks, units, topics, chapters, etc. You can add Assignments, Quizzes, Pages (customized content through the Rich Content Editor), Discussions, external links, and more. You can also require students follow a specific flow of activities by setting prerequisites before students may proceed to the next item in Modules, lock Modules to open automatically on a set date, and streamline your course so it’s easy for students to see their tasks and how the course progresses. Learn more in the Modules Overview video.
Add images, files, multimedia, and external content through the Rich Content Editor (RCE) in Pages. You can easily add direct links to other course items from other Pages, Assignments, Quizzes, and more. We highly recommend using the built-in Accessibility Checker to make sure your content is accessible to all students. Learn more in the Pages Overview video.
Assignments, Quizzes, Grading
You can set up Assignments to have students submit their work online in a variety of formats, including text entry, website URL, media recordings, student annotation, and file uploads (can restrict file types). If students are submitting their work in person, you can also select On Paper/No Submission and grade them through Assignments. Group submissions and peer reviews are options in Assignments as well. Learn more in the Assignments Overview video.
Notes on Grading in Assignments:
- Graded Assignments add columns to the Canvas Gradebook
- Easily grade student submissions through the Canvas SpeedGrader
- Assignments can be categorized into assignment groups to calculate the final grade
- Rubrics can be added to clear student expectations and for easy grading (see next question on Canvas Rubrics)
Use Rubrics to set up custom or outcome-based assessment criteria for grading student work. Grading rubrics communicate to students expectations of quality and provide a fair way to assess student work. Rubrics can be added to Assignments, Quizzes, and Discussions. Learn more in the Rubrics Overview video.
You can assess student learning through Quizzes. Currently, quizzes can be set up using either Classic Quizzes or New Quizzes. The New Quizzes engine has more question types such as hotspot, categorization, matching, and ordering. It also has more moderation and accommodation features. See a full comparison of Classic Quizzes and New Quizzes.
It may be best to use New Quizzes as this engine will eventually replace Quizzes in Canvas (Classic Quizzes). New Quizzes also has more question types such as hotspot, categorization, matching, and ordering, as well as more moderation and accommodation features. Learn more in the New Quizzes Overview video.
Canvas has four quiz types:
- Graded quiz (most common): Rewards students points based on their responses
- Practice quiz: Learning tool to assess how well students understood course material without a grade
- Graded survey: Rewards students with points for completing survey instead of based on right or wrong answers
- Ungraded survey: Obtains opinions or other information without a grade
It may be best to use the New Quizzes engine to create your assessments as Classic Quizzes will eventually be phased out of Canvas. If you prefer to use Classic Quizzes for now, learn more in the Classic Quizzes Overview video.
Canvas has four quiz types:
- Graded quiz (most common): Rewards students points based on their responses
- Practice quiz: Learning tool to assess how well students understood course material without a grade
- Graded survey: Rewards students with points for completing survey instead of based on right or wrong answers
- Ungraded survey: Obtains opinions or other information without a grade
Questions built in Canvas are automatically added to a question bank, which can be curated and shared between courses and instructors. You can also randomize your questions on assessments through question banks. See the following help guides for more information.
New Quizzes:
- Managing item banks
- Creating an item bank
- Add all items or a random set from an item bank to a quiz
- Share an item bank with another instructor
Classic Quizzes: (sunset date TBD):
First, enable a grading scheme for your course (see more on using grading schemes in a course):
- From the course side menu, navigate to Settings, where you will be taken to the Course Details tab
- Scroll to Grading Scheme and check “Enable course grading scheme“
- Select the “view grading scheme” link to view, modify, or select/add another grading scheme
- Make your updates and click Done on the Grading Scheme pop-up window
- Click Update Course Details at the bottom of the page
Then, set up assignment groups in the Assignments tool. This is where you will weight the final course grade based on assignment groups. Learn more on setting up assignment groups and weights in the Assignments Overview video.
SpeedGrader allows you to view and grade student submissions in one place using a simple point scale or complex rubric. The SpeedGrader can be accessed through Assignments, Quizzes, Graded Discussions, and the Gradebook. Learn more in the SpeedGrader Overview video.
Here are some benefits of the Canvas SpeedGrader:
- Everything in one place: Student work is displayed on the left hand side of the instructor’s screen, with the grading panel on the left
- Color-coded student list: Allows the instructor to see at a glance who has turned work in and needs to be graded (orange dot), who has already been graded (green check), and who has not yet turned in work (student name is light gray)
- Time stamp: Shown for each piece of student work – late assignments show LATE and time stamp is red
- Variety of feedback: Instructors can provide written as well as audio/video feedback
- Create feedback loops: Students can reply to your feedback within their graded responses
Some additional ways to use it are:
- Use the Mute Assignment feature to withhold your feedback from all students until you complete grading
- Use Rubrics to speed through grading
- Annotate student documents for students who upload a file that is a .doc, .pdf, or .ppt
- Use the Canvas Teacher App to grade as SpeedGrader is built into that app’s functionality
To learn about the Canvas Gradebook, see the Gradebook Overview video. Here are several features available in the Gradebook:
Organization
The View menu allows you to filter and sort the Gradebook according to several viewing options:
- Arrange By: Arrange columns by default, assignment name, due date, points, or module
- Filters: Filter columns by type (assignment group, section, modules, student groups, and grading period, if applicable)
- Statuses: View and change the color for a grading status (late, missing, resubmitted, dropped, and excused)
- Columns: Show or hide the notes column and the unpublished assignments column
Import / Export
In the Actions menu, you’ll find options to import grades and export grades to bulk-manage student grades in a spreadsheet.
Set Missing and Late Policies
You can set automatic policies for missing and late submissions in the Late Policies setting:
Missing Submission Policy: Automatically apply a grade for grade cells labeled as Missing. A submission is labeled Missing when a student did not submit to an assignment and the due date has passed.
Late Submission Policy: Automatically apply a defined penalty to grade cells with a status of Late. A grade cell is labeled Late when it is submitted past the due date. You can also define a threshold under which a student will not be scored (lowest possible grade), regardless of how late the submission is submitted.
Create Grade Posting Policies
By default, the Gradebook is set to Automatically Post Grades to students so that grades are visible to students as soon as you enter them. You can change the Grade Posting Policy to Manually Post Grades so that students will not see scores until you actively release them. You can also change the policy on each individual Gradebook item. See how to select a Grade Posting Policy in your Gradebook.
If you are using the Canvas Attendance Roll Call tool and sending those attendance scores to the Gradebook, we have encountered grading issues. The Attendance Gradebook column will update every time you take roll call. To avoid Attendance calculation errors:
- Do not manually adjust scores for the Attendance item in the Gradebook. The Gradebook does not currently adjust point value changes accurately after points have been manually changed, and the percentage values in the SpeedGrader and Gradebook will be incorrect. Only rely on grades automatically calculated by Canvas in Attendance instead of making manual adjustments.
- Do not delete, rename, or unpublish the Attendance item in the Assignments tool. If it is deleted, the Roll Call tool will not be able to take attendance. Canvas will automatically create a new Attendance assignment within 15 minutes after a failed attendance attempt.
Note: This is not the same attendance tool as the UNC Check-in Mobile App.
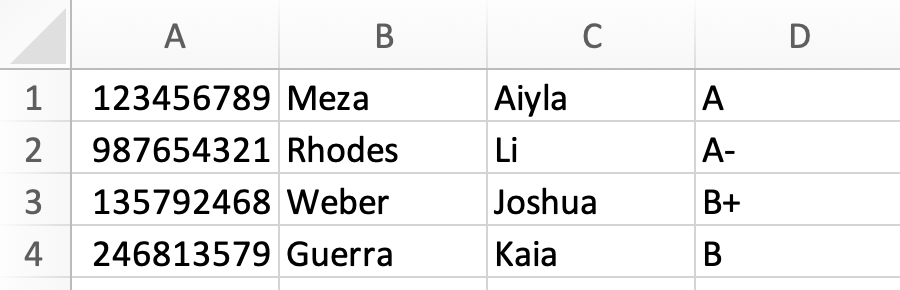
Instructors may choose to manually enter final grades into ConnectCarolina or export their grades from Canvas.
For reference, ConnectCarolina spreadsheet requires:
- 4 columns, no headers, no special formatting, saved as .csv
- First column: PID
- Second column: Last Name
- Third column: First Name
- Fourth column: Final letter Grade
Your final spreadsheet should look similar to this:
Step 1: Set Grading Scheme in Canvas
- Log into Canvas > go to course
- Settings > check box to Enable course grading scheme towards the middle of page > click set grading scheme
- Confirm grading scheme is accurate
- If not accurate, click Select Another Scheme
- Select Letter Grades with +/-
- Click to Use This Grading Standard
- Click Done, or if not accurate, manage grading schemes > + Add grading scheme > enter a title, adjust grades, click Save.
Step 2: Export Canvas Grades
- Go to Grades > Click on Export Final Grades for ConnectCarolina (located above the table with grades)
Step 3: Upload Grades to ConnectCarolina
Note that Canvas support team does not have access to ConnectCarolina system to confirm steps. See Grading Help for Faculty and Staff.
- Log into ConnectCarolina > Faculty Portal > Teaching section
- Select course number > Grade Roster
- Look for option to upload a spreadsheet
By default, students can no longer access a Canvas course at the end of the calendar month when the course ended (e.g. Fall semester course access ends Jan. 1). If a student needs access to your course after that point to satisfy an Incomplete grade or for other reasons, follow these steps to provide access.
Step 1: Modify course dates
- Go to Settings
- Confirm course is Published
- Confirm that course Participation is either set to Term or if set to Course, confirm start date is before original semester began and end date is after original semester ended
- Note: This is to avoid errors when adding new assignment due dates later in the process.
- Scroll down and click Update Course Details
Guide: Updating course access dates
Step 2: Create Incomplete Section
- Go to Settings > Sections
- In the ‘Add a new section’ field, type the new section name (e.g. Incomplete)
- Click +Section button
Guide: Add section to course
Step 3: Incomplete Section Dates
- Go to Settings > Sections
- Click the title of the Incomplete section
- Click Edit Section button
- For Starts, enter a previous date (e.g. original semester start date)
- For Ends, enter the date when Incomplete section students may no longer access course
- Check box “Students can only participate in the course between these dates”
- Click Update Section button
Guide: Updating course access dates
Step 4: Assign Students to Incomplete Section
- Go to People
- Scroll down to student, click ‘…’ icon, and select Edit Sections
- Type the section you created (e.g. Incomplete) or click Browse to locate
- Select the section when it appears in the drop-down menu
- Click Update button
- Repeat process to add other students to section as needed
Guide: Assign student to section
Step 5: Modify assignment due dates
Go to Assignments and scroll through the list to locate and edit any activities that the Incomplete section students need to complete. Follow steps below based on the type of activity.
Guide: Difference between assignment due dates and availability dates
For Assignments (paper icon)
- Click on assignment name
- Click Edit button
- Scroll down to Assign to
- Click +Add
- In Assign to, type and select section (e.g. Incomplete)
- Enter the Due Date, Available From, and Until dates
- Click Save button
For New Quizzes (solid rocket icon)
- Click on quiz name
- Scroll down to Assign
- Click +Add
- In Assign to, type and select section (e.g. Incomplete)
- Enter Due Date, Available From, and Until dates
- Click Save button
For Classic Quizzes (outlined rocket icon)
- Click on quiz name
- Click Edit button Scroll down to Assign Click +Add
- In Assign to, type and select section (e.g. Incomplete)
- Enter Due Date, Available From, and Until dates
- Click Save button
For Graded Discussions (speech bubble icon)
- Click Discussion name
- Click Edit button
- Scroll down to Assign
- Click +Add
- In Assign to, type and select section (e.g. Incomplete)
- Enter the Due Date, Available From, and Until dates
- Click Save button
Step 6: Contact Students in Incomplete Section
Contact all students in the Incomplete section to let them know that the course is available and for how long. Include any expectations you have about due dates, requirements, and how students can contact you with questions.
Students can log in at canvas.unc.edu. The course may be listed on the Dashboard but if it is not, check Courses > All Courses.
Additional Notes
These steps work for students already enrolled in the course. To add students not enrolled in course, you will need to modify course dates first to be able to add them under People using their Onyens (select Login ID to add them).
For external tools like Gradescope, you may need to update the due dates there as well. If students have already submitted assignments, they will not be able to submit them again unless you allow additional attempts.
Guides: Allow extra attempt on New Quiz | Allow extra attempt on Classic Quiz
External Tool Integrations
Note: Be sure to first enable the tools you wish to use through course settings.
Gradescope assignments and student scores can be added to the Canvas Gradebook, however the course roster does not automatically update between Gradescope and Canvas. As students add and drop your course, you must click Sync Canvas Roster in Gradescope to update your course enrollment between the two systems. The Gradescope assignments should be created through the Canvas Assignments tool, and once you have finished grading an assignment through Gradescope, you must Post Grades to Canvas.
From the Gradescope Instructor FAQs, please review the following questions to sync your Gradescope assignments with the Canvas Gradebook:
- Does Gradescope’s roster automatically sync with Canvas roster as students add or drop the course?
- No, must click Sync Canvas Roster button in Gradescope as students add/drop.
- How do I create a Gradescope assignment from Canvas?
- Create through Canvas Assignments > External Tool > Gradescope.
- Can I sync assignment grades in Gradescope with Canvas’ Gradebook?
- Yes, but must click Post Grades to Canvas button after assignment in Gradescope has been graded.
Embed Videos in Canvas course:
You can easily embed Panopto videos through the Apps (plug) icon in the Rich Content Editor.
Copying Videos Between Canvas Courses:
When copying content between Canvas courses, your Panopto videos (except student-created videos) will also be copied, including folder structures and student permissions. This is done through Panopto’s Course Copy V2 process. Instructors may also manually copy Panopto videos in Canvas if they wish.
Zoom Recordings:
Remember Zoom recordings are automatically sent to Panopto (My Folder > Meeting Recordings). If you are recording Zoom meetings with students, it is best to share the recording through Panopto instead of Zoom to help ensure student privacy is maintained within the course according to FERPA.
You can manually move your Zoom recordings into your Canvas course folder OR automatically send your Zoom recordings to your Canvas course (see Panopto FAQ section 5: “How do I make my Zoom course meeting recordings in Panopto available to students in Canvas?”).
See how to create video assignments in Canvas so that students can submit their Panopto recordings for grading.
Instructors may also use Panopto Quizzes as Canvas Assignments and send quiz results to the Canvas Gradebook.
If you are meeting online with your students, we recommend adding your Zoom join links to your Canvas course (see Joining Zoom Meetings > “How do I invite others to join my meeting?”). Consider adding your Zoom links through the Rich Content Editor on a page or your syllabus or linking to them in Modules.
See “How do I import Participation, Attendance, or Grades into the Gradebook in Canvas or Sakai?” on our Poll Everywhere Instructor FAQs.
We recommend selecting Course View in the VoiceThread tool in your course navigation menu so that students can quickly access all Voicethreads that have been shared with the course. Note this view cannot be changed once selected.
To create VoiceThread assignments and link to individual VoiceThreads within your Canvas course site, see adding a VoiceThread activity to your course (our institution uses Deep Linking).
See “How do I import UNC Check-In App attendance results into the Canvas Gradebook?” on our UNC Check-In App Instructor FAQs.