Panopto FAQ
Frequently Asked Questions
Answers to common questions about Panopto and the University’s implementation:
Section 1: Panopto – Introduction
Section 2: Students – Getting Started
Section 3: Faculty, Instructors and Staff – Getting Started
Section 4: Instructional Features
Section 5: Sharing Zoom Course Meeting Recordings With Students
Section 6: Working with Other Video
Section 7: Creating a Pre-recorded Video
Section 8: Recording In-person Course Meetings
Section 1: Panopto – Introduction
Panopto is a media management system that can be used by UNC faculty, students, and staff to host and manage video and audio content for a wide range of purposes, including instructional, research, or service-related use. This cloud-based service allows content owners to organize their videos in folders, perform basic editing tasks, and control access to their videos. Panopto can also be used to capture video, either for live in-person events (e.g., class sessions) or for pre-recorded content.
No, you will need to download those files separately.
First, be sure you have logged into your UNC-affiliated Panopto account. If you still do not see your Zoom recordings, check with your departmental IT staff. Some schools and departments are managing their own settings for users.
In order to help ensure a sustainable video storage policy, files that have not been accessed in two years will be identified during regular audits and removed. Owners will be notified before any files are removed. We will have more information to share about this policy as we near the first two-year audit increment.
Section 2: Students – Getting Started
Yes, students may also find Panopto useful for video storage and simple editing tasks.
All members of the campus community interested in creating a UNC-affiliated Panopto account should log in with their ONYEN at https://uncch.hosted.panopto.com. After you have logged in, you will have immediate access to your account. You can access your Panopto account through this same link at any time. Consider bookmarking it!
Panopto recommends the latest versions of Chrome, Edge (Chromium-based and legacy), or Firefox. Note that at this time Safari cannot be used to access the Panopto tool in Sakai.
Once you are logged into your UNC-affiliated Panopto account, select My Folder to access and manage your videos. Learn more about creating and managing folders.
Here is a breakdown of the folders that you should see on the left side of the screen when you log in:
Home: This folder is currently set to mirror the content in the Shared with Me folder.
My Folder: Your personal folders and subfolders. NOTE: This does not include any Sakai course folder content.
Shared with Me: All files that other users have shared with you. NOTE: This does include Sakai course folders content.
Everything: Most UNC users should see all the files under My folder and Shared with Me here. You may also see some files that have been shared publicly. We are still working with Panopto to fine-tune this aspect of our campus implementation.
Bookmarked: This folder will appear only if you have bookmarked files.
If you are trying to learn more about using a specific feature or tool in Panopto, we encourage you to visit Panopto support first. Panopto hosts a rich collection of up-to-date how-to documents and videos, and you are likely to get an answer to your question sooner going that route. In order to access basic and advanced training webinars and weekly Q&A office hours with Panopto staff, you will need to create an additional Panopto support account.
For answers to questions about getting started with Panopto and UNC implementation issues (e.g., login problems, Sakai, or Zoom integration issues), we recommend you start with the Frequently Asked Questions on this page. If you still need assistance, you can submit a service request with ITS.
For more detailed instructions, please visit Panopto’s How to Submit a Video Assignment in Canvas support page.
Instructors recording course meetings will likely make their videos available to you via Sakai. Your instructor will provide instructions about how to access them. In order to take advantage of the study features in Panopto, you will need to be logged into your UNC-affiliated Panopto account.
Once you are logged into your UNC-affiliated Panopto account, Panopto’s web viewer includes several tools designed to help you make the most of instructional videos. You can get a good overview by reading through the quick reference Student Guide to Using Panopto. Examples include the Notes feature, which allows you to type in private text notes that will sync up with the video in the same location when you return to them. The smart search feature allows you to search across videos (even text on images) to locate the video segment you are looking for. Take a minute to learn more about the Discussion and Bookmarks features as well.
Panopto includes support for screen readers, keyboard access commands, shortcut keys, accessible quizzes, smart search, and viewer captions. Learn more about Panopto’s accessibility features. If you have specific requirements for your assistive technology, contact Accessibility Resources & Services.
Panopto generally makes two major announcements each year regarding product updates, as well as ongoing regular announcements for smaller changes. You can keep track of them through the Panopto Forum Release Notes page. ITS-Educational Technologies will also try to make users aware of significant product changes at panopto.unc.edu.
Section 3: Faculty, Instructors and Staff – Getting Started
In addition to providing a secure way to share course videos with students, you can make your videos more engaging and interactive through Panopto’s editing and viewer tools. For example, you add value to an uploaded lecture by creating a table of contents, inserting a quiz, or adding a YouTube video. When logged into their UNC Panopto accounts, students can take notes that sync with your lecture, join a discussion with others who have access to your video, or search across all your lectures to identify a specific course topic. You can also use Panopto to create and capture video. Instructors teaching in-person courses may be interested in exploring Panopto for lecture capture.
All members of the campus community interested in creating a UNC-affiliated Panopto account should log in with their ONYEN at https://uncch.hosted.panopto.com. After you have logged in, you will have immediate access to your account. You can access your Panopto account through this same link at any time. Consider bookmarking it!
Panopto recommends the latest versions of Chrome, Edge (Chromium-based and legacy), or Firefox. Note that at this time Safari cannot be used to access the Panopto tool in Sakai.
Once you are in your Panopto account, select My Folder to access and manage your videos. Learn more about creating and managing folders and subfolders.
Here is a breakdown of the folders that you should see on the left side of the screen when you log in:
Home: This folder is currently set to mirror the content in the Shared with Me folder.
My Folder: Your personal folders and subfolders. NOTE: This does not include any Sakai course folder content.
Shared with Me: All files that other users have shared with you. NOTE: This does include Sakai course folders content.
Everything: Most UNC users should see all the files under My folder and Shared with Me here. You may also see some files that have been shared publicly. We are still working with Panopto to fine-tune this aspect of our campus implementation.
Bookmarked: This folder will appear only if you have bookmarked files.
If you are trying to learn more about using a specific feature or tool in Panopto, we encourage you to visit Panopto support first. Panopto hosts a rich collection of how-to documents, videos, and community forums. Panopto’s information is more likely to be up to date, and you are likely to get an answer to your question sooner going that route.
For answers to questions about the Panopto implementation at UNC (e.g. login issues, Sakai, or Zoom integration issues), we recommend you start with the Frequently Asked Questions on this page. If you still need assistance, you can submit a service request with ITS.
For Zoom course meeting recordings, you will want to restrict access to students enrolled in the course by making the recordings available through Sakai. See the FAQ section Sharing Zoom Course Meeting Recordings Via Sakai for information about how to do this.
For other videos, Panopto provides flexible access controls at both the folder ** and individual video level. We recommend storing video files in subfolders within your My Folder whenever possible. You will have more flexibility assigning permissions at the subfolder level than you will at the My Folder level. Here are the primary options for sharing videos in Panopto:
- Specific people
- Anyone at your organization with the link (available within UNC, but not searchable)
- Anyone with the link (public, but not searchable)
- Public on the web
** The ability to share files publicly is currently limited to individual files; you cannot share an entire folder/subfolders publicly. We are working with Panopto to resolve this issue.
Once a video (from any source) is stored in your Panopto library, you can use Panopto to make edits to the video. Panopto makes it possible to trim content from any section of a video. Additional video clips and streams can also be added to a video; up to four per video are supported. Quizzes, YouTube videos, and embedded live webpages can also be inserted into a video.
Keep in mind that Panopto’s video editing capabilities are limited. For example, it does not support transition effects between clips. Also keep in mind that editing video in a cloud service is more time-consuming, because changes you make to the video take more time to process.
Yes. More advanced video editing tools available at no cost include iMovie (Mac only) and Movie Creator (Windows 10). Adobe Premiere is a powerful video editor that is available to UNC faculty and students and supported by the University Library’s Media Resources Center. You might also check to see if your department is already supporting a video-editing tool.
Panopto includes support for screen readers, keyboard access commands, shortcut keys, accessible quizzes, smart search, and viewer captions. Learn more about Panopto’s accessibility features. If your student has specific requirements for their assistive technology, contact Accessibility Resources & Services for support.
The University’s Digital Accessibility Policy requires captions for all videos. Panopto supports automatic speech recognition technology to help with the creation of captions. For Zoom meetings, automatic captions will be included in the files that are automatically uploaded to your Panopto account. For other types of videos, use Panopto’s instructions on to add automatic speech recognition captions into a video to import the machine-generated captions. This technology is a starting point for providing quality captions. For more captioning consulting and resources, contact the Digital Accessibility Office.
Similarly, subtitles can be uploaded for foreign language videos. Learn more about supported file types for translated captions (subtitles) in Panopto.
Section 4: Instructional Features
Here are links to a few examples of videos hosted on Panopto and displayed through its Viewer:
- Pre-recorded lecture
- In-class lecture
- Lab demonstration
- Role play
- Embedded video (video at top of page is one example)
Yes. Students will have access to most of the same engagement features available in the embedded video viewer as they do through the regular video viewer, as long as they are logged in to their UNC Panopto accounts. Learn more about the features of the regular video viewer and the embedded video viewer.
Yes. With Panopto, videos can be embedded anywhere in the Canvas LMS and played back on-demand on any laptop or mobile device. From any embedded video, students can easily access search, the table of contents, notes, or discussion. Students may also choose to open an embedded video in the full interactive viewer if needed.
- Open a course in Canvas.
- You may embed a Panopto video anywhere in the course where you have access to the text editor such as Pages, Announcements, or Discussions. Navigate to the area where you would like to embed a video and choose to make a new item.
- Click on the plug icon in the text editor
- A pop-up window will appear that includes your apps. Search for and double-click your Panopto application to open the Panopto window.
- Browse or search through your available folders. Select the video to embed
For more information you can view Panopto’s How to Embed Panopto Videos in a Canvas Course.
In addition to making it easy for students to access class recordings via Sakai, the Panopto video viewer includes several tools designed to make student interaction with instructional videos more meaningful. These may be especially helpful to students interacting with pre-recorded asynchronous lectures.
They can use the Notes feature to type in private notes that will sync up with the video in the same location when they return to them. Notes can also be shared and downloaded. The Bookmarking feature plays a similar role as a navigational aid. The smart search feature allows students to search across videos (even text on images) to locate the video segment they are interested in, potentially saving them considerable time. Students can interact via text with other students or the instructor through the asynchronous Discussion tool.
We recommend sharing the Student Guide to Using Panopto with your students. In order to access most Panopto tools, students will need to be logged into their UNC-affiliated Panopto accounts. Note that the Discussion tool for individual videos may need to be enabled by the instructor in Settings.
Using the plus icon in the Video Editor, you can insert additional video clips, quizzes, YouTube videos, and external webpages that can be accessed and navigated within your video.
If you have time, yes. This may be especially helpful for students interacting with your recorded lectures asynchronously. We know that students’ ability to focus and retain information is enhanced when lectures are broken up into shorter segments (5-13 minutes). Creating a table of contents is an easy way to provide some structure for students. You might also consider adding quizzes as a way to help break up your lecture and provide students with feedback on their understanding of course material.
Inserting quizzes into recorded lectures and other course-related video is a great way to engage students and provide them with regular feedback on their understanding course material. Quizzes can be inserted at any point in a video. Question types are limited to those that can be automatically graded (e.g. true/false, multiple choice, multiple select, and fill-in-the-blank). Completion of a quiz can be required before a student is allowed to continue watching a video. Text feedback can be provided for each question.
No, not at this time. You can download a spreadsheet summary of the quiz results by question and by individual user.
Instructors can create a Panopto video assignment that is synced with Canvas and will report back quiz results and data. This allows instructors to both see who has taken the quiz and their results, as well as allows instructors to add quiz scores to the users’ grades in the Canvas course. Students can easily view the Panopto video and take embedded quizzes through Canvas.
For detailed instructions visit Panopto’s How to Use a Panopto Quiz as a Canvas Assignment support page.
Yes. Instructors who want to monitor activity in the discussion area for a video can enable discussion notifications. Instructors can choose to receive notifications after each post, or as daily or weekly digests. Learn more about the discussion notifications feature and how to set it up.
Yes. For Students to utilize the Panopto Tool in the RCE/Rich content editor to submit assignments in Canvas, they must first have record/upload privileges. Granting record/upload privileges in Panopto can be done by creating an Assignment folder or by enabling Personal Folders for the users, which will grant them the role of a Creator.
For more detailed instructions please visit Panopto’s How to Create a Video Assignment in Canvas support page.
Yes. Panopto allows you to track video usage statistics at the folder and individual video level. The graphs and dashboards it creates make it easy to visually track use across time, and statistics can be downloaded as reports.
Yes. Assignment folders can be set up that allow students to upload video assignments to one folder. Students will not be able to see other uploaded files in the folder unless the instructor edits the setting to allow it. Assignment folders should be created as subfolders within a course folder. Learn more about creating assignment folders in Sakai (courtesy of IIS at Gilings School of Global Public Health).
Yes, you can provide access to select folders within your Panopto library to specific individuals affiliated with UNC. If you want to give someone else access to edit a video that you manage, you will need to add them as a Creator to the folder in which the video resides. You cannot assign this access at the individual file level, only the folder level. Learn more about managing folder permissions.
Although there is currently no integration between VoiceThread and Panopto, you can export a VoiceThread as video and then upload it into your Panopto account.
Section 5: Sharing Zoom Course Meeting Recordings with Students
Yes! If you are already using Zoom to record your online class meetings to the Zoom cloud, we strongly encourage that you continue using it. Panopto is not a video conferencing tool. You may only need to use Panopto to store, manage, and apply simple edits to your videos.
All recordings of Zoom meetings that you host are automatically uploaded to your UNC Panopto account. When you log in to your Panopto account for the first time, any Zoom meetings you have recorded since September 5, 2020 will be available in your My Folder in a subfolder titled Meeting Recordings. Again, this date may be different for users in some professional schools. Check with your departmental IT staff to confirm.
Moving forward, however, you will want to configure your Zoom and Panopto accounts so that your course Zoom recordings are uploaded to a subfolder that students can access through Sakai. See next question for more information.
You can ensure that Zoom course meeting recordings uploaded to Panopto end up in your Canvas course folders by either moving videos into your folders manually or configuring them to automatically upload to the desired folder in Canvas.
You can set up automatic routing rules for any recurring Zoom meeting ID to your Panopto folder associated with your Canvas course.
- Navigate to your Canvas course site and click on the Panopto Video tool
- Click the Open in Panopto icon (
 ) on the far right. Panopto will open in a new browser tab.
 - Select your username from the top right corner of Panopto.
- From the dropdown menu that appears, select User Settings.
- On the User Settings pop-up window, scroll to Meeting Import Settings.
- Select the Meeting Mapping Source from the dropdown menu. This is the Zoom integration from which you will be mapping meetings.
- Select Add New to create a folder mapping for a recurring Zoom meeting.
-
Fill out the following information:
Meeting ID: input your Zoom meeting ID into the textbox (Fig. 21).
Folder Name: select the dropdown menu and select the folder to which you’d like this recurring Zoom meeting to be saved. Note: if the folder you are seeking doesn’t appear, you can start typing its name to search.
- Select Save to save this mapping, or Cancel to exit without saving.
You can ensure that Zoom course meeting recordings uploaded to Panopto end up in your Sakai course folders by either moving videos into your folders manually or configuring them to automatically upload to the desired folder in Sakai.
By following the instructions below, you can configure your Zoom course meeting recordings stored in Panopto to automatically upload to the appropriate Sakai course folder. A more detailed version of these instructions is also available.
- Log in at zoom.us and create a recurring meeting for your course. Copy/note the meeting number.
- Go to sakai.unc.edu and navigate to the desired course site.
- Go to Site Info and click Manage Tools.
- Scroll to the bottom section for External Tools.
- Check Panopto, click Continue, and then click Finish.
- Click on the new Panopto tool from your site’s tool menu on the left column.
- Click the Open in Panopto icon () on the far right. Panopto will open in a new browser tab.
- Click your name in the upper right corner, then User Settings.
- Scroll to Zoom Recording Import Settings to create folder mappings for the meetings you own.
- Click Add New.
- Paste the Zoom meeting number into the Meeting ID Under Folder ID, start typing in your Sakai Course ID. When your Sakai Panopto folder appears in the list, select it, and then click Save. All of this meeting’s cloud recordings will automatically be copied to this Panopto folder*. Students may access these by clicking the Panopto tool in Sakai.
- In order to complete the Zoom Cloud Recordings sync with Panopto, you will have to log into https://uncch.hosted.panopto.com directly to sync your Zoom account with your Panopto account. You only have to sync it once and all future zoom meetings mapped to Panopto folders will automatically sync.
Yes, you can provide access to select folders within your Panopto library to specific individuals affiliated with UNC. Learn more about managing folder permissions.
First, be sure you have logged into your UNC-affiliated Panopto account. If you still do not see your Zoom recordings, check with your departmental IT staff. Some schools and departments are managing their own settings for users.
If you have configured your Zoom settings to record a meeting in multiple views (e.g. gallery, active speaker, shared screen), all three recordings will be uploaded into one Panopto video. Each of the uploaded Zoom recordings is designated as a primary or secondary stream in your video. When you go into the Video Editor, you will see each stream in its designated place in the timeline.
By default, the primary stream will be active speaker and audio. Secondary streams will be gallery and shared screen. Learn more about where each stream appears on the screen when watching a video with the Panopto video viewer.
Anything that takes place in Zoom chat ends up in the Discussion section of your Panopto video. The Discussion feature also makes it possible for students to share questions/comments asynchronously in the recorded version of a video. This feature can be disabled under Settings.
Making course meeting recordings available through the Sakai- or Canvas-Panopto integration helps ensure that the University is compliant with FERPA rules that limit access to recorded class videos that include any information identifying attendees to students enrolled in the course. There is no other way to restrict access to students in a particular course.
While upload times will vary according to the length of the meeting, the number of views recorded, and Internet speeds, assume that the average Zoom course meeting recording will take about an hour to appear in your Sakai course site.
A: If you embed your videos using the Sakai text editor and copy content to another Sakai site, it will retain the permissions for the new students. There is an easy shopping cart icon to embed videos. For more information, see the question What are my options for linking to video content in Panopto from within Sakai?, also in this section of the FAQs.
Previously, Panopto’s course copy feature reused the same videos and continued to store them in the original course folder, but Panopto permitted users in new courses to access the original course’s content. Course Copy V2 works by adding reference copies of the original course’s content to the new course’s Panopto folder. Each course will have its own copy of the course’s Panopto videos. These reference copies can have settings that are independent of the original video, and they will be cleared of any user-contributed data from previous courses, such as notes, discussions, quiz results, and viewing statistics.
What is Copied?
Any sessions in the original course folder will be copied to the new target course, including sessions in subfolders. The folder structure of the original course should also be preserved. The exceptions to this are that any content in a Student Assignment or Submission folder will not be copied.
Videos that are embedded using the rich content editor plugin in the source course from other folders outside the course folder, such as the Panopto folder for a different course, will be copied to the target course folder. This includes videos embedded using the Panopto embed tool in Canvas. Embedded videos will be copied regardless of who originally embedded the video, but videos located in a My Folder are excluded.
The ability to share files publicly is currently limited to individual files; you cannot share an entire folder/subfolders publicly. We are working with Panopto to resolve this issue.
To make individual videos available to users no longer enrolled in your course, or to users external to the University, you can create a copy of the folder and then set your file permissions to make more publicly accessible . You will need to share the links to your files with your intended audience.
By default, Panopto does not make it possible for viewers to download a video. Like Warpwire, Panopto provides a wide range of access controls, including the ability to limit access to specific users and users with UNC-affiliated accounts. The integration with Sakai is the only way for instructors to limit access to recorded class sessions to students enrolled in that course. For more information on appropriate student use of class recordings, see this University guidance.
While the streaming software cannot solve all the problems created by low-speed connections, Panopto does use a variable bitrate solution that automatically reduces the quality of the streamed video when there is a problem, rather than pausing and buffering to maintain the highest quality.
Another possible solution is to make some of your videos available for these students to download and watch a non-streaming version. See previous question.
Section 6: Working with Other Video
Course meeting recordings in Zoom are just one possible type of video you will want to share with students. For example, you may be creating lectures outside of class for asynchronous courses you are teaching. Or you may be uploading third-party video clips to Panopto to share via your Sakai course site. You may also want to embed an external video.
Course meeting recordings in Zoom are just one possible type of video you will want to share with students. For example, you may be creating lectures outside of class for asynchronous courses you are teaching. Or you may be uploading third-party video clips to Panopto to share via your Sakai course site. You may also want to embed an external video.Again, if you recorded to the Zoom cloud, that video will automatically be uploaded to your Panopto account and be placed in your Meetings Recordings subfolder. If you are using Panopto to record, those videos will appear in the folder you are in when you begin recording. If you are uploading another pre-recorded video, you can use the upload feature in your Panopto account.
Yes, you can make copies of videos and assign them to different folders. The permissions for the copied video will be the same as those of the original file.
Linking to video content with Sakai’s text box editor
In Panopto, locate the video, click Share, copy the link, and add that URL as a hyperlink into Sakai’s text box editor.
Embedding Panopto videos with Sakai’s text box editor
Follow these steps, or a consult a video version of the instructions.
- Go to unc.edu and navigate to the desired course site.
- Click on the tool (ex. Lessons tool, Announcement, Overview) and add text.
- From the text box editor, click on the shopping cart icon (
 ).
). - Select Panopto from the list of external tools.
- Open the drop-down menu at the top to select different media folders in Panopto.
- Select the video and click Insert.
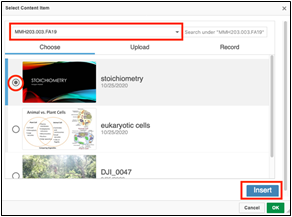
- Click OK to confirm.
- Repeat steps 3 – 7 for each additional video.
Your ability to link to video content within Panopto depends on permissions you set for sharing an individual video or folder. For example, you may choose to make some of your video content available to the public, some available only to users on campus, and some only available to students enrolled in a particular course (via Sakai).
For detailed instructions on embedding videos in Canvas, please visit the Panopto’s How to Embed Panopto Videos in a Canvas Course Site support page.
If you copied and pasted the embed code onto a Sakai page, then review step 7 below.
-
- Go to sakai.unc.edu and navigate to the new Sakai site.
- Click on Site Info.
- Select Import from Site and choose I would like to merge my data.
- Select the site that has the embedded Panopto videos.
- Select the tool(s) that have embedded videos.
- Click Finish.
If your Panopto video was embedded using the shopping cart icon in the Sakai text editor, you are finished. If not, proceed to step 7. - Make sure that the members of the new site have access to the media library that is hosting the Panopto videos.
- Option A: Set Panopto folder’s share settings to Unlisted: This means that the videos will not be discoverable by anyone browsing Panopto. It can only be accessed by having the direct link.
- Option B: Open the Panopto folder’s share settings and search from the course section in the Invite People search window. Select the Viewer group to allow the members in the new site access to the media.

Note: UNC-Chapel Hill set up the course copy feature for Canvas so that when a Canvas course is copied from site to site then the Panopto videos are automatically copied as well.
No.
Section 7: Creating a Pre-recorded Video
We refer to a pre-recorded video as one that is not a recording of a live event (e.g. course meetings, webinars). Examples of pre-recorded videos include asynchronous lectures, learning modules, and lab demonstrations.
Instructors creating pre-recorded videos have a variety of options for recording, or “capturing,” video. If you are already comfortable using a video capture tool (e.g. Zoom, Adobe Captivate) that meets your goals for the video, we encourage you to continue using it.
Panopto also supports tools for recording video. When you record a video through the Create button, Panopto’s video recorder will be downloaded to your computer. Panopto also supports a web-based video recording tool called Capture.
You can use Panopto’s video capture tools to record simple videos or more complex videos with up to four different streams. For certain types of projects, this feature may be useful. For example, consider a lab demo that requires multiple camera angles. Or you may be interested in creating a video that references multiple clips throughout the video (e.g. b-roll). Capturing video from multiple sources simultaneously may require the support of your departmental IT staff.
Yes. You can record with Powerpoint using either Panopto for Windows or Panopto for Mac. The web-based Capture tool is your other option for recording with Panopto. It works with either operating system.
Panopto supports a wide range of digital media formats. Learn more about currently supported file types.
Once a video (from any source) is stored in your Panopto library, you can use Panopto to make edits to the video. Panopto makes it possible to trim content from any section of a video. Additional video clips and streams can also be added to a video; up to four per video are supported. Quizzes, YouTube videos, and embedded live webpages can also be inserted into a video.
Keep in mind that Panopto’s video editing capabilities are limited. For example, it does not support transition effects between clips. Also keep in mind that editing video in a cloud service is more time-consuming, because changes you make to the video take more time to process.
Panopto is working to improve this function. Currently, the best way to proceed is to make multiple copies of the original file and then edit (trim) the copies to the desired sections.
Yes. More advanced video editing tools available at no cost include iMovie (Mac only) and Movie Creator (Windows 10). Adobe Premiere is a powerful video editor that is available to UNC faculty and students and supported by the University Library’s Media Resources Center. You might also check to see if your department is already supporting a video-editing tool.
Section 8: Recording In-person Course Meetings
Yes. Some instructors teaching in person on campus may be interested in using Panopto to capture classroom lectures, especially in classrooms that support multiple cameras and microphones. Panopto will be installed on the computers in all classrooms supported by ITS Classroom Hotline.
Keep in mind that technical constraints preclude you from using Zoom and Panopto at the same time in a classroom. If you are teaching in a classroom maintained by your department or school, check with your IT staff about support for Panopto or other classroom capture solutions.
In all General Purpose Classrooms supported by ITS Classroom Hotline (e.g. red phones), the standard document camera can serve as a video and audio capture device for simple classroom capture. If you are teaching in a classroom maintained by your school or department, check with your IT staff about your classroom capture options.